TAB DEMO -- DO NOT PUBLISH

Sort by:
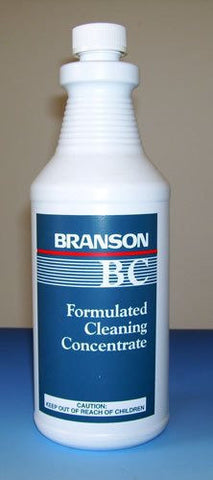
BC Buffing Compound - Chemical
BC Buffing Compound
From $30.00

Branson Ultrasonics has long been recognized as a leader in Ultrasonic Cleaner development, pioneering to use of rugged, powerful 40 kilohertz piezoelectric transducers and sweep frequency. Bransonic baths are used in R&D Laboratories, dental labs, surgical centers, and in a wide variety of light Industrial cleaning applications.

Medical and dental labs: Branson offers safe and consistent cleaning of dental and surgical instruments. Units can also sterilize with the use of appropriate cleaning solutions.

Industrial ultrasonics: Removal of soils, rust, oil, and drawing compounds from machine parts in production. Ultrasonic cleaners are also widely used to return repaired or serviced components to their original pristine condition.
Electronics: Easily remove flux and other soils from circuit boards, quartz crystals, individual electronic components, iPhone and iPad circuit boards, computer parts and more.
Jewelry: Restore the sparkle to watches, bracelets, necklaces, rings, and loose gemstones. 
Laboratory: Cleaning glassware, lenses, ceramic, metal components, and instruments.

Branson Quick Start Guide
Video

Branson Quick Start Guide

The Branson Quick Start Guide will get you up and running quickly with your new Bransonic Ultrasonic Bath.

Do this:

  • Add a wetting agent or surfactant to your ultra sonic cleaner. This will reduce the surface tension of the liquid. Reduced surface tension will increase cavitation strength and provide better cleaning.
  • Always allow at least one inch between the tank bottom and the beaker or receptacle for adequate cavitation. When parts are on the tank bottom, ultrasonic energy is reflected back to the tank bottom, and can damage the transducers.
  • Only use safe, water-based cleaning solutions without a flash point. Never use flammable solutions. And yes, this includes IPA.
  • Keep solution within one inch of the top of the unit when the beaker or tray in place.Reducing the amount of solution does not increase ultrasonic power in the remaining solution.
  • Always degas your solution for at least five minutes after filling the tank. This is only required after supplying fresh solution, and you don't need to do it again.
  • Use the accessories supplied by the ultrasonic cleaner manufacturer. They will be properly designed to maximize cleaning efficiency. Don't let your solution become too dirty! Clean solution just plain works better.
  • Be certain to read your Operator’s manual for detailed information on operation, applications, solutions, maintenance, and troubleshooting. This guide will get you running, but you really should go over the manual. 
Don't do these things:
  • Do not operate the unit with an ungrounded outlet. Don't remove the grounding prong.
  • Do not open your unit case — The high voltage inside the unit is dangerous.
  • Do not immerse the unit in water, or operate it where it could be splashed with water.
  • Do not operate the unit without filling it first. This will destroy the transducers and render the unit unusable.Do not let your cleaning solution drop more than 3/8 inch (1 cm) below the operating level line with the heater on. Doing so will cause the heater to fail.
  • Do not use mineral acids or chlorine solutions such as chlorine bleach. These could damage the tank.
  • Never place parts or containers directly on the bottom of the tank. Use a perforated tray, mesh basket, support rack, or beaker cover to hold your parts.
  • ! WARNING  Do not use alcohol, gasoline or flammable solutions. Doing so could cause a fire or explosion. Use only water-based solutions. 

Installation

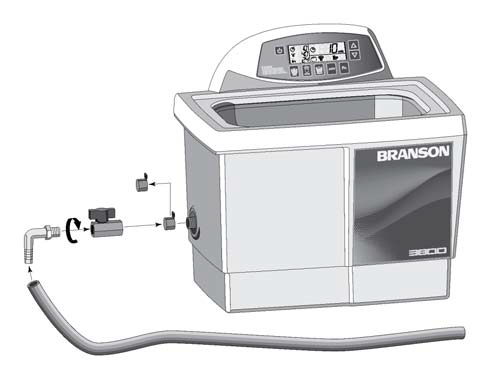
For models 3800, 5800, and 8800:branson cleaner drain assembly

  1. Remove thread protecting cap and hand tighten the drain valve. Use Teflon tape on the drain threads to prevent leaks.
  2. Finish tightening the valve using a 21 mm or an adjustable wrench. Tighten no more than 1 full turn until the valve handle is on top. DO NOT OVERTIGHTEN.
  3. Hand tighten the hose adaptor. Slide the drain tube over adaptor end.

For all Models:

  1. Plug detachable line cord into the back of the unit.
  2. Connect the unit to a grounded power source. (Consult data-tag on back of unit for electrical ratings)

Operating the M/MH Models

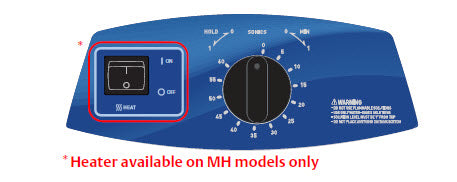
branson M-MH model controls

  1. Fill tank with properly diluted solution close to the operating level line per the manufacturer’s recommendation.
  2. Turn Main Power switch on (located next to the power cord receptacle)
  3. Turn the Timer Knob clockwise to 5–10 and let the unit run to allow the solution to “degas.”
  4. Turn HEAT switch on, if available.
  5. Turn the Timer Knob clockwise to set the amount of time (0–60 minutes) you wish the items to be cleaned.
  6. Or - Turn the Timer Knob counterclockwise to the HOLD position for continuous operation.
  7. Place the items into a basket, perforated tray, or beakers in a positioning cover. If using beakers or a solid tray, add cleaning solution to beakers or tray to cover the items.
  8. Slowly lower the tray or beakers into the tank. Do not allow items to contact the tank bottom. Do not stir the solution.
  9. When items are clean, slowly remove them from the tank.
  10. Rinse the clean items with clean water and dry them, if necessary.

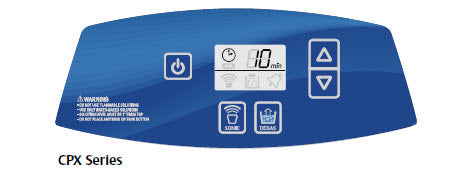
CPX series control panel

NOTE: To stop ultrasonics at any time, press the Sonics key ( ).

  1. Fill tank with properly diluted solution close to the operating level line per the manufacturer’s recommendation.
  2. Turn Main Power switch on (located next to the power cord receptacle)
  3. Press the On/Standby key ( ) to turn on the unit.
  4. Set the amount of time you wish the items to be cleaned: Use up/down keys to increase/decrease cycle time (hold for quick increments/decrements).

    NOTE: For CPX model only. Pressing up key from 99 minutes or down from 1 minutes takes you to Constant Sonics Mode ( and “- -” on the display).
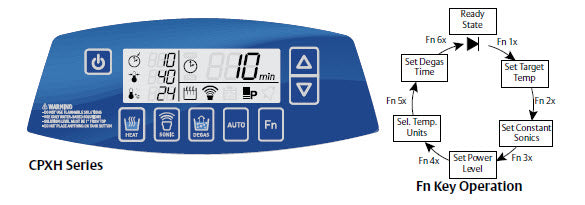
  5. Press the Sonics key ( ) to activate ultrasonics.
  6. Place the items into a basket, perforated tray, or beakers in a positioning cover. If using beakers or a solid tray, add solution to beakers or tray to cover the items.
  7. Slowly lower the tray or beakers into the tank. Do not allow items to contact the tank bottom. Do not stir the solution.
  8. When items are clean, slowly remove them from the tank.
  9. Rinse clean items with clean, warm water and dry, if necessary.

CPXH cleaners control sequence

Degassing
NOTE: To stop degassing at any time, press the Degas key ( ).
Activating Heat (CPXH Only)
NOTE: To stop heating at any time, press the Heat key ( ).

  1. Follow steps 1 to 3 from the Cleaning Items instructions.
  2. Press Degas key ( ) once to start the degas process. Default degas time is 5 minutes. Use up/down keys to increase/decrease cycle time (hold for quick increments/decrements).
  3. Follow steps 1 to 3 from the Cleaning parts instructions.
  4. Set the tank temperature:
    • Press the Fn key until the Set Temperature icon ( ) flashes.
    • Press the up/down keys to alter the setting to the tank temperature you wish to maintain. While blinking, press the Fn key until all the icons stop blinking or wait 15 seconds to return to the ready state.
    • Press the HEAT key ( ) once to activate heat. The Heat icon ( ) appears.

NOTE: Heat can be activated before or during ultrasonics.


Video

This video will walk you through the cutting edge features of Branson's CPX Series cleaners.